skip to main |
skip to sidebar
I just received my Sephora package today (although it arrived on Saturday) and in it were 2 new Urban Decay palettes. One is the Vice 2 palette and unfortunately, I can't review it since it's not mine. It's an order for someone else but I did order the Anarchy Face Case.
Quite honestly, I don't normally like to order palettes that include lipsticks in it because I tend not to use potted lipsticks. I also don't like the fact that they are usually open pans and the powder from eye shadows and cheek colors can fall into them.
Anarchy Face Case doesn't include lipsticks in a pan. It is a two-tiered palette in which the eye shadows are on the top tier and the cheek colors are on the bottom tier with a slot for an eyeliner pencil and lip stick. The lip stick also peeks out into the top tier. There is also a mirror on the lid of each tier.
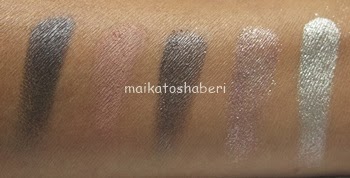
Eye shadows from left to right: Redemption, Fray, Vaporize, Provocatuer, Revolt.
Cheek colors from left to right: Fetish, Quickie, Craze (highlighter). There's also a 24/7 Glide On Eye Pencil in Perversion and a full-size Super Saturated High Gloss Lip Color in Scandal.
Three eye shadows on the right, starting with Vaporize are very glittery and remind me of the moondust eye shadows. In fact, when I first opened it, I thought that two of the colors were the same as the moondust shadows that I have.
As you can see, the are not the same.
Swatches were done with no primer.
Eye shadows, in same order as in the palette:
Lip Color and Blush:
I was a bit disappointed with Fray and Provacateur. Fray comes out a bit chalky on me and even the eye shadow itself was a slight bit crumbly. Provacateur also was slightly crumbly. Both are not as nicely pigmented too and needed several applications to get it to show up the way it does in that swatch. The other 3 colors are really nice and buttery.
I use the Super Saturated High Gloss Lip Color in Lovechild and love the formulation. The only thing that I'm not thrilled about is that you need to use a pencil sharpener in order to get more of the lip color. I would love the packaging if it were like Tarte and Clinique in that you can twist up the color. The cheek colors were very nice. I'm not sure that I would use Quickie since it's quite a strong pink color. It was also very pigmented so you need to use a light hand in applying it. I love Fetish! It's a color that I would definitely use. I don't use highlighters too much but I think that Craze would be quite easily wearable. I didn't swatch Perversion as I don't normally use eye pencils and I think that Perversion has been in other palettes before so swatches should be available.
I'm looking forward to playing the Anarchy Face Case.
Did Urban Decay tempt you with their new recent releases?
*Kat*
This is just a quick update to the "new" gel nail manicure that I posted about here.
It is now two weeks since I did the manicure and I'm happy to report that there is no tip wear or chipping. However, it did start to lift at the cuticle line and peeled a bit just before I took pictures.
Overall, I'm really happy using gel nail polish. It stands up to my nail abuse. I have really soft nails, which bend and tear easily. Using gel nail polish helps to strengthen my nails so that they can grow longer.
*Kat*
As with many places, this summer has been quite hot and humid. Wearing the foundations that I had normally been wearing wasn't working out as it would melt off. In the past I had used Bare Minerals foundation and loved it until it started emphasizing the signs of aging, mainly fine lines. I was worried about purchasing it and not liking it so I decided to go the inexpensive route and chose Maybelline Mineral Powder Foundation. If I didn't like it, then I wouldn't feel so badly about not using it.

I must say that I liked it a lot! I was surprised by how nicely it sat on my skin. I felt that it gave decent coverage and held up for most of the day. I only had to touch up under my eyes and my nose, which is normally what I have to do anyway--usually at the 8 hour mark. I decided to and give Bare Minerals a try but was disappointed that I couldn't find a good color match and it seemed to bring out my fine lines. Since I'm going to be using this powder foundation only for the summer, I decided to stick with Maybelline. The color that I originally got was Natural Ivory, which was slightly too light. I went and picked up Nude but that was a little too dark so I mixed the two and found it blended to a nice match. The two Maybelline foundations still came out to less that I would have paid for Bare Minerals so it's a win for me. The only downside is the brush that is included. It's a bit scratchy and I prefer to use the brushes in my collection.
I can't wait for it to cool down a bit.
*Kat*
I realized today that I haven't done an EOTD post in a while. I've been really boring the last few months using only the same eye shadows and blush. I recently purchased some new things from a blog sale, in which there were several Addiction eye shadows. I am so happy to have acquired them and the people doing the blog sale were fair in their pricing and so very helpful and quick. There are still quite a few items available so if you're interested in checking them out, please go here to sgbeauty sales. My main contact person has been Elaine, who I got to know through blogging, twitter and instagram. A super sweet and beautiful person.
On to my EOTD...
Products Used:
UDPP Original Eye Shadow Primer Potion in Original (not pictured)
Addiction Single Eye Shadows in Horizon and Blue Moon
K-Palette Real Lasting Eyeliner in Black
I first prime my eyelids using Urban Decay Primer Potion. It's the best eyelid primer for me. I was looking at the newly released Anti-Aging primer but the SA at Sephora told me that if I'm using a firming eye cream, then I'm getting more benefits from that than I would from the new primer potion and that I should just stick with the original, which I like so much. (Thank you SA for saving me $28.00.)
I then applied Horizon to the inner 2/3rds of my upper eyelids from lash line to just above crease. Blue Moon is applied to the outer 1/3rd of upper eyelids and blending it in towards the middle. Lined my upper eyelid and outer corner of lower lash line using K-Palette. Using Blue Moon, I go over the eyeliner on lower lash line and blend it in towards mid eye. I also applied Blue Moon to the outer "V" and blended it in.
It's a very simple eye look but I was pleased with the results. It's a softer look than I normally wear but I didn't feel like it was too soft on me. In fact, when I walked into the MAC store this afternoon, my regular SA there saw me and he said that he really liked my makeup today. That was definitely an ego booster!
The other Addiction eye shadow that I had purchased through this blog sale was Deep Forest. I had debated about it but I'm so glad that I did because I found out recently, after I purchased it, that it will be a discontinued color. I found this information out from Rouge Deluxe's blog post.
Have a great week everyone!
*Kat*
I know that I am a bit late to the game on doing this review as I know that quite a few other bloggers have done reviews. I still wanted to share my own thoughts on it though.
Clarins Double Serum:
According to the box, what it is:
I am really liking this serum. I find it to be lightweight yet hydrating. It absorbs quite easily into my skin. I have found that if I follow the instructions and use two pumps, it will be way too much product. I use only 1 pump and it's enough for me. The only thing that I don't like about it is it is a bit on the pricey side. I'm just about finished with my first bottle and have already purchased a back up.
*Kat*
When my friends returned from Korea, they brought back Nature Republic Super Origin CC Cream Color Change for me to try.
It is a Complete Control cream that offers skin care benefits as well as makeup benefits. This is an advanced multi control cream that will improve the appearance and texture of your skin tone by smoothing it out. There are color capsules in it that will burst when you rub the cream on and it will match to your natural skin color.
My thoughts on it:
It comes in your standard tube that has a pump dispenser.
I like that you can easily control how much to dispense.
The cream itself, comes out white, which surprised me even if it does say "color change".
Fortunately after I rubbed it into my skin, it didn't stay white but did seem to color correct to my skin tone.
Here I've applied the cream to my face (the right side in the picture).
It seems like it's blending in nicely.
This is the cc cream applied to my whole face.
It looks nice but is slightly lighter than my natural skin tone. I don't mind that since foundations, BB creams, etc. all seem to oxidize on me so I normally will apply a foundation that is slightly lighter. Unfortunately, this didn't oxidize on my at all and it stayed too light on me. I have to admit that I didn't rub in the cream but stippled it on but I think that it would have still made the color capsules burst.
Other than it being a little too light for me, this cc cream was really nice. It lasted with over 8 hours of wear and it was a really humid day. It gives nice, buildable coverage. I think that I'll try mixing it with Clinique's CC cream, which oxidizes on me so much that I get way too dark. I just have to get it back from Mai.
Has anyone else tried this CC cream? If so, what are your thoughts on it?
*Kat*
After my last NOTD post in which it was the first time I tried doing gel nails, I had to redo it because that first one was so poorly done. I'm happy that this 2nd attempt yielded a much better result.
I have a problem taking the traditional NOTD pictures so I ended up doing it this way for the best picture result.
Products used:
TruGel Mojito (a turquoise/teal green)
TruGel Crushed Diamond
Sensationail Silver Glitter
I used the primer and base/top coat from Sensationail. Two coats of Mojito was applied, which is a jelly-like finish. I applied a coat of Crushed Diamond and then Silver Glitter was applied on the tips.
I've already had this on for a few days and have done dishes as well as a host of other things. So far it seems to be holding up very well. I'm going to see how long this manicure lasts.
*Kat*
While I normally do this post every other month, I just had to do one this month as it is all makeup products, something which is difficult for me to use up.
Rimmel Fix & Perfect Pro 002 Primer. This primer has been working out really well for me this summer. I love this new formulation. The older, tinted formulation did not work well for me at all. I've already purchased and am using a new tube.
Maquillage Moisture Finish Powdery UV Foundation. I don't use this as a foundation but as a finishing powder. This is the 2nd pan that I've used as I had bought 2 at the same time several years ago. I believe that this was a fall/winter release so I am hoping it gets released again as I liked it.
Canmake Cheek & Cheek 06. This was a LE color from a year or two ago. It was a great color and product to use. I find that Canmake blushes appeal to me and they are reasonably priced in Japan.
Covergirl Clump Crusher by Lashblast mascara. This is by far my favorite mascara. I have bought several back ups of it. Here's my review.
K-Palette Real Lasting Eyeliner 24h WP. I can't live without this eyeliner! I always love the LE packaging as it usually is pink. The new one that I opened up to replace this one is in the regular black tubing. I'm still getting used to looking for the black tube instead of pink when I want to use my eyeliner.
Discards:
While it's wasteful to have to throw away products, some items just can't be helped. I normally like to try to "recycle" products by either giving it away or selling it but items that can't be safely sanitized has to be discarded.
Eyeko Skinny Liquid Eyeliner Pens. I had read great reviews on this eyeliner and loved the fact that it came in different colors other than black and brown. Unfortunately, this isn't for me. I find that the application isn't as smooth as K-Palette. Although it's supposedly waterproof, I find that it smudges and color transfers on me very easily. While I fully line my upper eyelid, I line only the outer end of lower lashline. By half a day, my eyes look like a raccoon because of color has transferred to under my eyes and it's not a pretty sight. I have only used each of the colors once or twice but since they are felt tip pens, I don't think that these can be safely sanitized so they will have to be dumped. How unfortunate!
*KatI
I think that I'm finally back to normal life schedule. I also finally got my new computer to replace my dead one. I've been itching to blog but since I lost all of my pictures which were on my old computer, I had to start taking new pictures. Since I'm so anxious to do a blog post, I'm doing a NOTD type of post, although my polish application technique is something awful.
I had been looking into DIY gel nails and reading reviews on various products out there. I was thinking of getting the Sally Hansen one until I read about how small the LED lamp is. While my daughter-in-law was here visiting, she ended up buying Sally Hansen gel nail strips not realizing until after she got home that you need an LED lamp. This was just the motivation that I needed to go and buy one. I decided to get Sensational by Nailene.
I bought the starter kit, which was great. I also like the fact that the lamp is small but can do 4 nails at a time and then you do your thumb. The instructions are simple and basic application is easy to do. I decided to be adventurous on this first time around (not a good idea) and try to do a gradient nail, like I've done in the past with regular nail polish.
After nail prep and base coat, I applied the 1st coat using a pale pink shade. You really can't see it well.
I then tried (key word is "tried") to apply a really light coat of the darker pink shade slightly higher than the pale pink shade. And then I tried to do another light coat of the same pink shade slightly higher than the previous one.
I then applied a silver glitter shade, which I tried to lightly apply to blend out the various layers. Topped with top coat and did the finishing step.
Between each coat of polish, you need to "set" it under the LED lamp. For the base/top coat, it's 30 seconds, for the color polishes it's 1 minute. I really liked that it doesn't take much time under the lamp and the polish sets and dries. For me, it's a real plus because I almost always end up smudging my nails because they aren't completely dried.
I also bought the gel polish removal starter kit. It's great to have although not completely necessary.
I love the look of the gel nails. It was easy to do. I love how the polish seems to last on me without chipping for at least a week. Regular nail polish manicures have tip wear and/or chips by the next day. I don't like that this brand doesn't have a huge shade variety. I would have liked to have more shade variations to make a nicer gradient nail. I think that next time I should use eyeglasses to see better and do a cleaner application. The polish removal is a bit of a humbug.
I really want to find a source for gel nail polish that has a nice selection of colors as well as a clear with holographic glitters. If any readers know of any sources, please share with me.
I can't believe that it's September already! I hope you all had a great summer.
*Kat*


 on Twitter")


