skip to main |
skip to sidebar
Sorry, I thought about editing the previous post but decided to just do a quick new post.
I forgot to mention that when I start applying the foundation, my starting point is always the center of my face, which is the nose area. I like my foundation to have heavier coverage on the nose and cheek area because that's where I have the most dark spot pigmentation that I wish to cover. Since I stipple foundation on, I work my way from center towards the outer edges of my face, gently blending and tapering the color of the foundation outward. I find that doing this works best for me and helps with better color matching the foundation to my skin tone.
This works its way into a whole other topic--color matching foundation that isn't' quite the right match to my skin tone and contouring. Anyone interested in reading posts on my technique(s) for that?
*Kat*
Today I will be doing a review on Bourjois Healthy Mix Serum Gel Foundation and combining it with my foundation application technique, which is basically a continuation of my concealing technique in the previous post.
Bourjois Healthy Mix Serum Gel Foundation:
It states on the bottle that it is an instant blending gel which gives a semi-matte finish and creates a flawless complexion with undetectable coverage. It contains vitamin-rich fruits which include lychee, goji berries and pomegranate. This gel foundation provides 16 hours of radiance-boosting, even and revived complexion.
Brushes used:
e.l.f. Powder Brush, Sonia Kashuk Pointed Foundation Brush and Clinique Bronzer/Blender Brush
As I mentioned in the previous concealing post, I apply my concealer before foundation. In order to keep the concealer in place, I use a flat top brush to stipple on foundation . Face with concealer applied and ready for foundation application.
I pump about 3/4 pump of Bourjois Healthy Mix Serum Gel Foundation onto the back of my hand and swirl the flat top brush in the foundation and start stippling it onto my face.
Using the Sonia Kashuk Pointed Foundation Brush, I lightly pick up some foundation from the back of my hand and pat it onto the hard to reach areas, like under the eyes and sides of the nose.
Here the foundation is on half of my face. You can see how nicely the foundation has blended into my skin, almost perfectly matching my skin tone. The first time I tried the foundation, I thought that it was a lot lighter than my skin tone but I find that it depends on how much I apply.
Here's a closeup of the applied foundation.
I then use more Orgasm to cover the large hyperpigmentation on my cheek that was concealed and use a powder foundation to lightly dot the smaller concealed spots.
Using the Clinique Bronzer/Blender brush, I pick up very little powder to set my foundation. Normally I use Cle de Peau loose translucent powder because it's very finely milled and there's less of a chance of it settling into fine lines.
I will then use the Sonia Kashuk brush again to lightly smooth out the undereye area by patting any remaining foundation on. Usually the foundation has pretty much dried out by now but there's just enough to pat on. This is the finished result.
In my previous concealing post, I mentioned how if I use a powder over the concealer on the large spot on my cheek, the end result would be a large white spot under my blush, which is why I like to use NARS Orgasm instead. To show you what I meant, I heavily applied powder foundation to the smaller spot instead of using a light hand. You can see the visible white area toward the upper left corner. This is why it's important to remember to lightly apply the powder foundation to the smaller concealed spots.
The Bourjois Healthy Mix Serum Gel Foundation can be a nice match color-wise for me as long as I remember not to over apply. Since it is a gel foundation, it is a wetter and a bit heavier foundation than the 123 Perfect Foundation. I find that it doesn't last as long as the 123 Perfect Foundation and is surprisingly, less hydrating than 123 Perfect Foundation. Since it is a heavier foundation, I find that it does tend to settle into and bring out some fine lines.
I don't know if those of you who use this foundation have found this to be true but I have found that the healthy mix serum in this foundation does work. After I wash my face for the night, I find that my complexion seems to be more refined and smooth, like I had just used a mask. Even upon waking up in the morning, my complexion still seems to be more refined. After using it for several days in a row with the same result, I do believe it to be the vitamin-enriched fruit boosters.
Out of the two Bourjois foundations that I received, I have to say that the overall winner for me is the 123 Perfect Foundation. I have read many rave reviews about the Healthy Mix Serum Foundation and I can see why. Although it doesn't work quite as well on me as the 123 Perfect Foundation, I like that it does help to make a healthier complexion for me.
*Kat*
Today's review is on the Daiso Double-Ended Stick Concealer.
This was in Yumeko's "Top 8 Beauty Related Buys from Daiso here. She graciously gifted me with one and I finally got around to trying it out.
One of the unique things about this concealer is that it is double ended. One end is wide and the other end is pencil tip thin.
I like this concept especially if you are wanting to conceal smaller problem spots.
Before I continue into my concealing method, please let me ramble on a bit about my skin blemish "history". I grew up with freckles, a bit unusual for a full-blooded asian, I think. I always hated my freckles especially as they continued to multiply as I grew older. Of course, living in Hawaii and always being in the sun didn't help especially since back when I was in my teens, sun screen protection wasn't stressed. Then one day, I had a pimple on my cheek and after it was gone, it left a dark spot which also blended into a cluster of freckles leaving one huge dark spot on the apple of my cheek which, to this day, doesn't lighten or go away. I've tried many lightening products and have had many suggestions from makeup artists as to the best technique and products to use to conceal this dreaded large spot as well as my smaller freckles. One suggestion was to use an orange-colored pencil to conceal as many makeup artists use this technique especially for photo shoots. I tried it and unfortunately ended up with orange spots that really weren't obvious unless you looked at closeup shots or saw me in person really close up.
So I've taken all the information that I have gleaned over the years and came up with what works best for me. It's probably most unorthodox and perhaps many professional makeup artists will cringe but it's what works for me and I'm happy with the result.
I must say that I like using a peach-toned concealer and my HG is Sue Devitt Bermuda Triangle Undereye Corrector. For the purposes of this post, I'm using the Daiso Double-Ended Stick Concealer to review it at the same time. My technique and products that I use is the same, just the concealer is different.
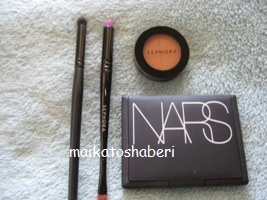
Normally I prime and prep my face and do most of my eye makeup first and then I conceal and apply foundation. Besides the concealer, the other products that I use are Sephora Smudge/Eyeliner brush, e.l.f. contour brush, Crown Brush fluff brush, Sephora Eyeshadow in sun-kissed N° 78 and NARS Orgasm blush.
I start off with my primed and prepped face.
Using the wider end of the Daiso concealer, I smudge some of it onto my finger and pat it under my eyes.
Using whatever is remaining on my finger, I pat it onto the large dark spot and to the sides of my nose. Using the Sephora brush, I pick up some concealer and start covering the large dark spot.
Using the pencil tip end of the concealer, I dot the larger, darker spots. (Normally I use the Sephora brush to apply concealer to the larger, darker freckles.)
The concealer is quite visible and this is true even with my HG concealer.
To help create a more natural concealed look, and to provide more coverage for the large, dark spot, I use the e.l.f. brush and pick up some Orgasm and then some sun-kissed and apply it to the large dark spot. Trying to keep a light hand, I add this combination until it is concealed decently well.
Using only sun-kissed, I apply it to the other spots that I used concealer on. Using the Crown Brush fluff brush, I lightly apply sun-kissed to under eye, sides of the nose and and over all the dotted areas to blend everything together.
My face is now ready for foundation to be applied.
I do realize that the normal procedure for applying concealer is liquid foundation first and then conceal, or if you are using powder foundation, then you conceal first. Although I use liquid foundation, I like to conceal first because the areas where you use a concealer will be lighter. Applying a foundation over will minimize and most likely eliminate the white lighter spots. This is also the reason why I like to use a flat-topped brush and stipple on my foundation. Oftentimes I will apply more Orgasm to the large dark spot before and after applying foundation. Because it is on the apple of my cheek I need that area to have more "orange" coverage. After applying blush, it is concealed nicely. If I use a lighter color or powder to cover and set the concealer, that area will show up as a white spot under the blush. I have found Orgasm to be the best color for this purpose. I originally wanted to use a matte eyeshadow as sun-kissed is a bit pearlized but this color was the best for what I wanted to do and it ended up working out much better, I think. It helps to brighten up the under eye area and I think that it also helps to reflect light away from any imperfections.
Although the Daiso concealer isn't peach-toned, which I normally like, using this method helped to color correct the concealer so that it worked out nicely. In Japan, this concealer is only 105 yen, which is a bargain! It worked well on me. I didn't need to touch up (although I don't touch up unless I'm going to go out after work) and it didn't settle into fine lines. As Yumeko said in her post, it's great for keeping in your office drawer or gym locker.
Sorry for the length of this post. I know that it seems like a lot of steps and time consuming but it actually goes quite quickly for me. I must say that I have a love-hate relationship with my dark spots. I really dislike having the dark spots on my face and am considering medically getting it removed. However, I do like the fact that I can test and see how well a product works by having the dark spot.
I will write a post on how I apply my foundation another time.
*Kat*
One of the reasons I wanted to travel to Japan was to be able to view sakura. We thought that we had timed it correctly for viewing but it was in full bloom in Tokyo when we landed, which was at 10:00 p.m. We were also leaving early the next morning for Fukushima and knew that when we returned to Tokyo, the season would be over.
We went out for an early morning walk within the hotel area, which was in Nihonbashi and were fortunate to catch a few trees in bloom.
Nihonbashi, Tokyo
Once in Fukushima, we did much sightseeing and saw many wonderful things but the weather was cold until late this year and it was quite unfortunate that we didn't get to see any sakura. Sakura season in Fukushima was running a week to two weeks late. There was even a Sakura Matsuri (Festival) held in Wakamatsu at Tsuruga-jo. No sakura, only buds. We were told it looked like we would be leaving Fukushima and then within a few days it would be blooming. Not to be discouraged, we did some research the day before we left Fukushima and found out that in Utsunomiya, sakura was still blooming.
We got off the shinkansen (bullet train) at Utsunomiya Station and a very helpful worker outside the station helped us to catch the bus to the park that we wanted to go to. It was just a short bus ride to Hachimanyama Park. We first went to the shrine grounds and found beautiful sakura there. The shidarezakura (weeping cherry) was in this area and they are my favorite.
Shidarezakura
Once we got into the park, the view was just breathtaking! It was so beautiful. Trees were in full bloom in different shades ranging from white to dark pink. There were people doing hanami (flower viewing) while enjoying lunch, and many people just walking and enjoying the serenity of the petals flowing in the air from gentle breeze.
We were so glad that we were able to finally see the beautiful sakura. It is no wonder that it is a beloved flower of the Japanese people.
Once we headed back to Tokyo, we met up with our good friend. The following day, we visited her father's working place and his secretary told us that there is a special sakura tree close by. Amazingly, even our friend didn't know about this tree even though it was in close proximity to her home. This is not a common sakura. Did you know that there's such a thing as green sakura?! From afar, it looks like a regular tree with green leaves but all that green is sakura.
How fortunate we were to be able to view this sakura, known as gyoiko.
We also learned that after the regular sakura season is over, the multi-petal sakura starts to bloom. I'm sorry, but I don't remember the name of this variety. These are really pretty too and the blossoms are quite large.
EDIT: Thanks to K of Cosmeddicted, she told me the name of this sakura is Yae zakura, which means 8 layer sakura.
If you look closely at the first picture, toward the bottom center, you can see my husband's thumb in between the blossoms. It gives you an idea of how big these blossoms are.
Seeing the sakura in their natural environment, my love for these blossoms has grown even more. It has been and continues to be my favorite flower.
*Kat*
P.S. If you click on the picture, you can view it in a larger size.
I recently wrote about the wonderful package that I received from the very lovely Yasumi. In it were two Bourjois foundations, Healthy Mix Serum Foundation and 123 Perfect Foundation. Both are in shade #53. I will do a proper review of the Heatlhy Mix Serum Foundation of of these days but did want to say that although they are both the same shade, I think it's slightly lighter with the Healthy Mix.
123 Perfect Foundation:
123 Perfect Foundation, according to the product description, gives an even, flawless complexion for 16 hours.
It has 3 perfection pigments so that there are no imperfections.
The coverage is medium, has SPF 10 and provides 24 hour hydration. I really like that is has a nice pump dispenser.
So let's see how it works on my spotty face. I've only done regular skin care routine and primed.
Normally I do my eye makeup first and then apply my foundation but I wanted to show you how the application looks after it's sat on my skin for awhile so I applied it on half of my face. The product does oxidize slightly--sometimes it takes up to an hour before it does. On the large spot pigmentation as well as other larger spots and under the eye, I do use a concealer.
As you can see, the color match on this is pretty good, although a slight bit too light. However, I prefer to work with foundations that are too light versus too dark. It gives nice coverage and does even out my skin tone quite nicely.
Foundation is applied to whole face.
Again, very nice coverage and even the freckles that I didn't cover up with concealer are not so visible.
Bourjois Blush in 34 Rose D'or
I love the cute little concave brush that is included in the blush. Not that I use it but I think it's so cute.
It is a beautiful pink with gold shimmer. The color is perfect--it's so me!
Blush applied to my cheek.
Front view with face fully done.

The 123 Perfect Foundation does what it says it does--provides an even, flawless complexion with the 3 perfection pigments. I usually don't wear my foundation for 16 - 24 hours so I can't personally vouch for their claim that it will last for 16 hours or provide 24 hour hydration. It's been really humid here recently so after 8 - 10 hours, I have found my makeup to be "melting" on me. It is okay for me to go throughout the day with but I will need to touch up here and there if I want to go out without completely redoing my makeup. Normally I prefer a more dewey finish because I like that slight glow and I do not like matte finish because I find the product tends to settle into fine lines and look cakey but I haven't had that problem with this foundation. This has been the foundation that I have been reaching for everyday as it provides me with nice coverage and doesn't feel like I have anything on. It's especially great in this humid weather that we've been having. The blush is nicely pigmented, a bit light but since I tend to have a heavy hand, it's great for me to apply and not get "clown cheeks". As I mentioned earlier, I love the color.
I will do a review on the Healthy Mix Serum Foundation as soon as I use it regularly. I must admit though, it may be a while since I'm loving this foundation so much right now.
Thank you again Yasumi for the wonderful gifts!
*Kat*


.JPG)


.JPG)


.JPG)
.JPG)


 on Twitter")


