Showing posts with label concealer. Show all posts

Wednesday, July 22, 2015

Purchase Review: MAC Prep + Prime CC Colour Correcting Compact and Kat's Current Concealing Method Part 2

This is the 2nd part of my current concealing method. You can see part 1 here, which is the prior post.

Continuing on...

To set the concealer pencil on the large dark spot, instead of using powder as I did for the other areas, I now use MAC Prep + Prime CC Colour Correcting Compact in Recharge, which is an apricot colored powder. 


I have been using different forms of orange-toned powders for a long time now to try to conceal and set because using powder, even if it's translucent powder, shows up as a white spot when I apply blush.


After I apply the CC powder, I set my whole face with translucent powder (Cle de Peau loose powder) and finish up my makeup routine, applying blush and lipstick.

This is after 10+ hours of wear:


As you can see, the combination of NUDESTIX concealer pencil and MAC CC concealer powder hold up very well. I only touched up my nose with some powder as it has been very humid here plus my nose has been a bit stuffy and I've been fussing with it with tissues.

MAC Prep + Prime CC Colour Correcting Compact is a pretty hefty-sized compact with 8 .0 grams/.28 oz of product. The compact itself is a mirrored, black hard plastic case.  For the amount of product that I use, it will take me a very long time before I will need to make another purchase.

I really like this powder as it is a matte powder. A lot of the other powders that I had been using had some shimmers in it. While in some ways shimmer is good in that it reflects the light away, it would sometimes still show up as a lighter spot when blush was applied.

So far, I'm quite happy with the results and will continue on until I find another product that piques my interest.

*Kat*

Monday, July 13, 2015

Purchase Review: NUDESTIX Concealer Pencil and Kat's Current Concealing Method Part 1

My nemesis is the large dark spot that is on the apple of my right cheek. I've reviewed a number of different concealers but my current favorite is NUDESTIX Concealer Pencil. I was a little apprehensive ordering this online from Sephora, sight unseen because I'm really particular about swatching colors to match my skin tone, which isn't the easiest to find a good match for. Unfortunately, the stores locally do not stock it so I had no choice. The sales person was really helpful though and actually went to check the foundation that I'm using to match the color of the concealer to. She matched it to Medium 6, which ended up being a great match for me.


While I feel it's not necessary, it comes in a tin container. The pencil is a chubby stick, which is creamy and is not self sharpening.


Also included in the container is another cover, which opens up into a sharpener. This is nice and handy for use when traveling. The inside cover of the tin is a mirror. I can see converting this into a magnetic palette!

The concealer is nicely pigmented with nice coverage. It's so simple to use, just color it on like you did as a child coloring pages with crayons. You don't need much to get good coverage, which is good because it can get quite heavy if you use too much.

Bare face:


Foundation only (Sorry, I don't know why the picture is so white!) FYI, I use BareMinerals Bare Skin Serum Foundation in Bare Beige 8 :


Concealer applied:


I then set the concealed areas with powder, except for the large dark spot.

I like the ease in applying this concealer. It's really quick and I don't have to use extra brushes to apply and blend in. It will also be very easy to travel with. It is a bit pricey at $24.00 but it works well and a little goes a long way. My only wish is that there was the option to purchase just the pencil instead of buying the whole set. I just received my backup order and it seems like such a waste to have gotten another tin and another sharpener.

I had previously done a review of a similar type of concealer, which was from Daiso. You can read it here and see the similarities and differences between the two.

My next post will be the finishing touches of concealing.

*Kat*

Sunday, June 24, 2012

Gift Review: Daiso Double-Ended Concealer & Kat's Method of Concealing (Picture Heavy)

Today's review is on the Daiso Double-Ended Stick Concealer.


This was in Yumeko's "Top 8 Beauty Related Buys from Daiso here. She graciously gifted me with one and I finally got around to trying it out.

One of the unique things about this concealer is that it is double ended. One end is wide and the other end is pencil tip thin.


I like this concept especially if you are wanting to conceal smaller problem spots.

Before I continue into my concealing method, please let me ramble on a bit about my skin blemish "history". I grew up with freckles, a bit unusual for a full-blooded asian, I think. I always hated my freckles especially as they continued to multiply as I grew older. Of course, living in Hawaii and always being in the sun didn't help especially since back when I was in my teens, sun screen protection wasn't stressed. Then one day, I had a pimple on my cheek and after it was gone, it left a dark spot which also blended into a cluster of freckles leaving one huge dark spot on the apple of my cheek which, to this day, doesn't lighten or go away. I've tried many lightening products and have had many suggestions from makeup artists as to the best technique and products to use to conceal this dreaded large spot as well as my smaller freckles. One suggestion was to use an orange-colored pencil to conceal as many makeup artists use this technique especially for photo shoots. I tried it and unfortunately ended up with orange spots that really weren't obvious unless you looked at closeup shots or saw me in person really close up.

So I've taken all the information that I have gleaned over the years and came up with what works best for me. It's probably most unorthodox and perhaps many professional makeup artists will cringe but it's what works for me and I'm happy with the result.

I must say that I like using a peach-toned concealer and my HG is Sue Devitt Bermuda Triangle Undereye Corrector. For the purposes of this post, I'm using the Daiso Double-Ended Stick Concealer to review it at the same time. My technique and products that I use is the same, just the concealer is different.

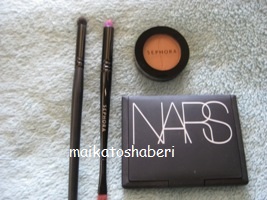
Normally I prime and prep my face and do most of my eye makeup first and then I conceal and apply foundation. Besides the concealer, the other products that I use are Sephora Smudge/Eyeliner brush, e.l.f. contour brush, Crown Brush fluff brush, Sephora Eyeshadow in sun-kissed N° 78 and NARS Orgasm blush.


I start off with my primed and prepped face.


Using the wider end of the Daiso concealer, I smudge some of it onto my finger and pat it under my eyes.


Using whatever is remaining on my finger, I pat it onto the large dark spot and to the sides of my nose. Using the Sephora brush, I pick up some concealer and start covering the large dark spot.


Using the pencil tip end of the concealer, I dot the larger, darker spots. (Normally I use the Sephora brush to apply concealer to the larger, darker freckles.)


The concealer is quite visible and this is true even with my HG concealer.


To help create a more natural concealed look, and to provide more coverage for the large, dark spot, I use the e.l.f. brush and pick up some Orgasm and then some sun-kissed and apply it to the large dark spot. Trying to keep a light hand, I add this combination until it is concealed decently well.


Using only sun-kissed, I apply it to the other spots that I used concealer on. Using the Crown Brush fluff brush, I lightly apply sun-kissed to under eye, sides of the nose and and over all the dotted areas to blend everything together.


My face is now ready for foundation to be applied.


I do realize that the normal procedure for applying concealer is liquid foundation first and then conceal, or if you are using powder foundation, then you conceal first.  Although I use liquid foundation, I like to conceal first because the areas where you use a concealer will be lighter. Applying a foundation over will minimize and most likely eliminate the white lighter spots. This is also the reason why I like to use a flat-topped brush and stipple on my foundation. Oftentimes I will apply more Orgasm to the large dark spot before and after applying foundation. Because it is on the apple of my cheek I need that area to have more "orange" coverage. After applying blush, it is concealed nicely. If I use a lighter color or powder to cover and set the concealer, that area will show up as a white spot under the blush. I have found Orgasm to be the best color for this purpose. I originally wanted to use a matte eyeshadow as sun-kissed is a bit pearlized but this color was the best for what I wanted to do and it ended up working out much better, I think. It helps to brighten up the under eye area and I think that it also helps to reflect light away from any imperfections.

Although the Daiso concealer isn't peach-toned, which I normally like, using this method helped to color correct the concealer so that it worked out nicely. In Japan, this concealer is only 105 yen, which is a bargain! It worked well on me. I didn't need to touch up (although I don't touch up unless I'm going to go out after work) and it didn't settle into fine lines. As Yumeko said in her post, it's great for keeping in your office drawer or gym locker.

Sorry for the length of this post. I know that it seems like a lot of steps and time consuming but it actually goes quite quickly for me. I must say that I have a love-hate relationship with my dark spots. I really dislike having the dark spots on my face and am considering medically getting it removed. However, I do like the fact that I can test and see how well a product works by having the dark spot.

I will write a post on how I apply my foundation another time.

*Kat*

Wednesday, September 7, 2011

Purchase Review: Sue Devitt Bermuda Triangle Undereye Corrector

Sue Devitt is a beauty line that has recently been introduced into the islands via Macy's. It is a line that I had never heard of before and since it's mainly within the U.S., I don't think that it's very well known. I had been looking at this line every time I passed by the display. It intrigued me because of the concept of this whole line is inspired by exotic destinations and is infused with derivatives from nature, mainly marine and floral. It is supposed to be hydrating and anti-aging. All of these are components that are important to me.

I finally decided to take a test run and ended up purchasing the Bermuda Triangle Undereye Corrector with Orchid Extract. It is an undereye moisturizer and concealer.  It is a stick concealer in a twist type of container. It contains . 08 oz/2.5 g of product, which is comparable to other brands of stick concealers.


The ingredient list:

Click to enlarge so that you can read it

A swatch on white paper:


According to their website information on this product,  Orchid extract helps to keep the delicate undereye area hydrated, reduces fine lines and wrinkles and fights free radicals. It is peach hued to contrast with the blue-green tones that are common in undereye dark circles. It corrects, conceals and hides imperfections and creates a flawless complexion. There is also a special ingredient called Nylon-12 that expands and contracts in relation to your facial movements. This ensures flexibility in the formulation so it won't crack or crease. It has durability and long-lasting coverage.

As most of you know,  I have a rather large, dark spot on my cheek and it is difficult to find a concealer which will cover it up well. I've also mentioned before how one MUA told me that orange/peach tones work best in concealing dark spots. Since Bermuda Triangle is a peach-hued concealer, I put it to the test.

My naked face that has been prepped and primed:


After initial application of Bermuda Triangle, applied to undereye area and various dark spots on face:

I dabbed a little more Bermuda Triangle to the large dark spot and set it with my favorite setting powder:


Final look after applying Sue Devitt foundation (which will be in a later review):


I'm amazed by how well this concealer worked! You can't see that large dark spot at all.

This is after more than 10 hours of wear. I did touch up with powder on my nose and under my eyes, just a little bit. This is normal for me each day:


As you can see, the concealer is holding up very well on my cheek where the large dark spot is. I didn't do any touching up there.

I'm really happy with the result of this concealer. As promised, it didn't cake or settle into fine lines. It did seem that my undereye area stayed hydrated. I believe that I will repurchase this again.

There is only one color for Bermuda Triangle Undereye Concealer. Since it is peach hued, it is considered a universally flattering color. While there are places scattered within the United States where you can purchase this line, it doesn't seem to be widely available. You can purchase it online but unfortunately, they do not do international orders. You can find it in the UK at Harvey Nichols Knightsbridge. For more information, you can visit Sue Devitt online here.

*Kat*

Tuesday, August 2, 2011

Why Dermablend Cover Cream is Kat's Current Favorite

I've been asked by various people, whether it's blog readers or others that I know, why I don't use Make Up For Ever's concealer. I've even been asked that by Sephora's makeup artists/sales associates because it is apparently a favorite amongst most people. It is not from lack of trying it because I have actually purchased a tube of Full Cover and used it. For me, Dermablend's finish is just way better than MUFE.

MUFE:

Right after application

After wearing it for several hours

Dermablend:

Right after application. Sorry, I didn't take a picture after
several hours of wear but there were still no fine lines showing.

As you can see, MUFE brings out any fine lines that I have under my eyes. I don't have as significant of a problem with Dermablend. MUFE is waterproof so as a result, it dries up while Dermablend keeps my skin moisturized, which I think is a big factor as to why fine lines appear with MUFE. I even did swatches on a white cardstock and after 6 hours, I went back to the swatches. MUFE felt just like the cardstock while Dermablend still felt moist. The only drawback it the concealer having moisturizing properties is that when it's quite humid, it may fade so a touchup may be necessary.

I hope that this comparison was helpful.

*Kat*

Tuesday, February 15, 2011

Review: Maybelline Fit Me Foundation

It was a long and tiring work week last week with the busiest and most draining day being yesterday, Valentine's Day. I'm so exhausted today but glad to be back in my regular routine so I am doing a review that I've been wanting to do.

Maybelline recently released a new foundation called Fit Me. According to their website, "It's makeup that fits you." There is no oil or wax. It has a natural coverage and allows skin to breath, be fresh and natural. It has an exclusive translucent base along with lightweight pigments. This allows the skin's natural highs and lows to show through. It is also dermatologist tested and non-comedogenic.


Along with the foundation, there is concealer, pressed powder, blush and bronzer. I only thought about it now but I should have taken a picture of the display at the store. The interesting thing is that there is a chart which shows if you use this color foundation, then you use this powder, this concealer, etc. All of the products have a color name and are number coded. For example, when I first made a purchase, I bought foundation 130 and the concealer that it was coordinated with was 15. 130 was waaay too dark for me so I switched it to 125 Nude Beige, powder in 125 Nude Beige and concealer was still 15 Fair Clair. I found that foundation 125 Nude Beige was still a little too dark for me (it made me look like I have a ruddy complexion), so I purchased foundation 120 Classic Ivory and powder 120 Classic Ivory. If I remember correctly, by following the color matching chart, I should be using a different concealer, which would be lighter than the 15 but I decided not to buy it. Foundation 120 Classic Ivory is a little too light for me, making me look somewhat ghostly so unfortunately, I have to buy two different colors to achieve my ideal color. The good thing is that these are quite inexpensive since they are a drugstore cosmetic line.

I have been using these foundations, powder and concealer for well over a week now and I must say that I'm quite impressed! It's supposed to be natural coverage and I like to have medium to full coverage but I find that this gives more than ample coverage. When using it in conjunction with a primer, it is long wearing. I usually don't even do any touching up unless I have to go somewhere in the evening. It does have a slight, sweet scent to it but it's not overpowering and it's quite pleasant. It doesn't linger.

Bare face which has been prepped with my usual morning routine and primed with Missha BB Boomer (a review will be upcoming after I use it more).


The foundation comes in a screw top bottle, which many of us do not like because it's not as sanitary as a pump and it's harder to control the amount of product that comes out. I've found that instead of trying to pour it onto my fingers/hand, I completely cover the top of the bottle with my hand (which is clean) and tip the bottle over. After righting the bottle back to an upright position, I then remove my hand. Usually the amount of product that is there is sufficient for what I need. If I need more, then I repeat the process. The foundation itself is not extremely runny nor it is extremely thick.


Using the technique that I blogged about a couple of posts back, I apply the two different color foundations using a stippling brush--actually two stippling brushes, one for each color. Comparing the bare-face picture with this one, you can see how much coverage there is.


I have not used powder in a long, long time because when I do, it tends to make my skin too matte and the dreaded fine lines show up. I was brave and applied powder and while it does help to set the foundation, it doesn't turn it into a matte finish and it doesn't bring out the fine lines. Again, very impressive! The powder is quite fine. I've also used dermablend concealer to cover the large dark spot on my cheek.


Here I have completed my makeup for the day by applying Physician's Formula Happy Booster Pink Heart Rose Blush (upcoming review on this too). Yup, another drugstore brand. On my lips is Canmake Maxi Volume Rouge in 02 Pink Berry.


After over 12 hours of wear, this is what my face looked like without any touching up. This was just after a very long day at work with a lot of running around, going in and out of a cooler, etc. It still looks quite decent.


This is what the concealer looks like. It is in a squared tube and has a doe foot applicator.


Here's I've applied concealer 15 Fair Clair to my undereye area and topped it off with a light swipe of powder 120. By the way, I never use the powder puffs that come with the powder compacts. I always apply with a very soft powder brush.


Even with the addition of concealer and more powder, the fine lines are still kept at bay. Overall, I'm very impressed by this foundation. I haven't used drugstore products in a long time but as I mentioned in a previous post, I think that drugstore brands have really stepped up. I can't remember exactly what I paid for each of the items but they were all under $10.00 USD. Combining the cost of all 4 of the items still came out to around the cost of 1 brand name foundation bottle that I use. I do believe that I will continue purchasing and using this (until a better one comes along. Yes, I'm fickle!). It hasn't broken me out nor has does my face get a prickly feeling that I often get when using a drugstore brand of cosmetic.

One thought that I have had is that perhaps the dreaded fine lines aren't showing up as much because it is the result of using Olay Regenerist Resurfacing Elix Moisturizer. As I mentioned in that review, I do think that my skin is looking more refined since I started using it.

*Kat*

Friday, January 14, 2011

Review and Discovery: Dermablend Professional Cover Cream

I'm trying to catch up with all of the things that I need to blog about so today I'm going to review Dermablend Professional Cover Cream. I believe that this one is different from Vichy Dermablend but I'm not absolutely positive.

This is a cover cream that is for heavy duty coverage. Many people, my mom amongst them, use this to cover birthmarks or other major skin flaws. According to the Dermablend website, the "full coverage foundation for moderate to major skin flaws that delivers 12 hours of consistant color wear. Lightweight formula glides on evenly and delivers all day hydration as well as SPF 30 sunscreen protection. Water-resistant and smudge-resistant when used with Setting Powder".


As I've mentioned before, I have a huge dark spot on my right cheek. It's right on the high point of my cheek which gives me some difficulty in apply blush. With all of the concealers that I have tried, the only one that I found that helped to conceal it the best is Canmake Cover and Stretch concealer. However, as with all of the concealers that I've tried, when applying blush, I can't brush it on since the concealer will rub off unless I dab the blush on.


I finally decided to try my mom's Dermablend and was quite impressed. I only use it to conceal my dark spot. It comes in a jar type of container and contains a significant amount of product. It is quite hard--like a cream cake. To keep the large jar sanitary, I have scooped out a small amount of product and put it into a smaller container. I'm actually using one half of a contact lens case. While I like to apply it with my fingertip because I can warm and soften the concealer a bit, I usually use a double-ended smudge/eyeliner brush from Sephora. I use the smudge side to apply the cover cream. It's rounded with short bristles. It kind of reminds me of a cotton swab.  After applying, I let it dry and then as suggested use a powder to set it. I don't use Dermablend's setting powder but use a powder foundation that I already have on hand and it works just as well. What has impressed me is that I can brush blush on and it doesn't budge. Of course, I do use a light hand but it still stays. My only problem, and it is a problem with all concealers, is that after setting it with powder, after applying blush, that area shows up as a white spot. It doesn't matter that everything had matched my skintone prior to applying blush. This has been my dilema for many years now. To cover that white spot up, I use an eyeshadow brush to dab on blush onto the white spot for added coverage. It usually works well except after 8 hours or so when the blush starts to fade and the white spot starts to show again.

Cover Cream applied

Powder foundation applied over Cover Cream

Jill Stuart Blush applied. See how there's a white spot.

I think that I mentioned before that a MUA told me to use an orange-toned pencil to cover my spots instead of concealer as that is an industry practice. However, when I tried it, I ended up with orange dots all over my face instead of a nice, unblemished face. After brainstorming a bit, I decided to try using NARS Orgasm as a setting powder since it is a nice coral-toned blush. I am happy to report that it works perfectly! I actually tried using whatever blush that I was planning on using that day as a setting powder but it didn't work well with all of the colors. For example, when I used Lancome Rose Deco, it actually darkened the concealed spot. Orgasm will work and blend well with any blush that I decide to use for the day.

NARS Orgasm applied in place of setting powder

Same Jill Stuart blush applied. There's no white spot and it's more evenly concealed!

I am very happy with the Dermablend Cover Cream. It will take me a long, long time to finish one jar since I use so little of it. I believe that it's not available in Hawaii any more so it needs to be ordered online. I'm not sure how widely available it is in stores around the nation though. When I last checked online, it seems that it's available in Dillards in Las Vegas. I still like using Canmake Cover and Stretch concealer to highlight my undereye area.

Have a wonderful weekend!

*Kat*