skip to main |
skip to sidebar
I was actually thinking of doing a different post but am so excited by this product that I had to rush and write this review.
I am not a powder person. Although lately I've been experimenting with different powder-type foundations, it hasn't been going very well. I used to LOVE powder foundations and powders but as I have aged, it has started settling into fine lines and bringing out fine lines that I didn't even know existed! I have been using Cle De Peau loose translucent powder to set my foundation but very sparingly. It is very finely milled so it has worked the best as a setting powder, as long as I don't use too much.
Recently, I discovered NARS Light Reflecting Setting Powder--Loose and and been reading some pretty good reviews on it so decided to try it.
The ingredients:
What NARS says:

I've been using it quite regularly for about a week now and I'm totally loving it! It does exactly what NARS says it does. It is finely milled and very light to the touch. It hasn't brought out my fine lines and actually smooths out my complexion without making it look dry. There is a slight hint of a glow which really enhances your complexion. It's long-wearing on me and does seem to be hydrating. The only thing that might be a negative is that it has a slightly meaty/animal scent to it. It reminds me of when I was into making soap (melt and pour glycerin soaps) and one additive that I liked to use was this product called Silk. It also had a meat scent to it. The scent doesn't last long and it's only a hint of the scent as you're applying it. At first, I wasn't sure if it was my brush because my brush is made out of badger fur and when I wash it, it has that animal scent to it. I then used a synthetic brush and it had the same scent as I applied the powder so then I knew it was the powder.
I had a "sleep over" at Mai's house on Saturday night and told her that she needed to try this "magic" powder. She doesn't like to use powders either but she was pretty impressed with this powder too.
I purchased this at Sephora for $34.00. This will definitely replace Cle De Peau as a setting powder.
*Kat*
I'm back with another L'Oreal Lash Serum progress report. I've been showing weekly progress pictures every other week or so with 2 to 3 weeks pictures. I must say that at this point, it doesn't seem as much more has happened or perhaps will even happen so I don't think that I'll post each week's picture unless you'd like to continue seeing it.
This is week 7, again with no makeup and with makeup.
Again, I must say that I've been very impressed by this serum and will continue to use it.
I had a couple of Christmas parties to attend in the same night and I wasn't sure if we would try to make both. I decided to do a green and gold holiday EOTD and finally wear some mascara with my newly grown lashes.
Products used:
Urban Decay Eyeshadow Primer Potion: Eden (not shown)
Urban Decay Eyeshadows: Blitz, Junkie (Vice Palette), Kush, Loaded (BOS III Palette)
K-Palette Real Lasting Eyeliner
NARS Pencil Eyeliner
Canmake Agebuto Mascara
Maybelline The Colassal Volume Express Mascara
Sephora Collection Glitter Eyeliner and Mascara: Gold


As usual, I primed my eyelids with primer potion.Blitz is applied to the inner 1/3 of eyelid, Kush to the middle 1/3 of eyelid and blended in sweeping back and forth motion into and just above the crease, sweeping out towards the end of the outer corner. I did not sweep it completely to the inner corner. Junkie is applied to the outer 1/3 of eyelid and blended into Kush. K-Palette is applied to upper lash line and outer corner of lower lash line. It's basically just dotted there to connect the uppler lash line lining to the lower lash line. Loaded is used to line the lower lash line, blending the dotted outer corner and fading the lining towards the middle of the eye. Loaded is also used to the outer "V" of upper eyelid to add a bit more depth. I curled my eyelashes--for the first time since I started using the lash serum--and applied a light coating of Agebuto mascara. It is a waterproof mascara and I need to use waterproof mascaras to hold the curl if I wanted it to be as I curled it. I then applied a couple of coatings of The Colossal Volume mascara to the upper lashes and lightly to the lower lashes. I usually don't like to apply mascara to my lower lashes because it makes me look like I have black eyes. Having been using the lash serum, it has really enhanced my lower lashes as well and applying mascara gave it an even more extreme look so to soften it I used a brush to angle it towards the outer corner. I then applied NARS pencil eyeliner to upper waterline.


As a last step to add a bit more glitz to my eyes, I applied gold glitter eyeliner to 1/4 of the lower inner lash line. Unfortunately you can't really see it in the picture. The product that I used for this is Sephora Collection Glitter Eyeliner and Mascara. The SA at Sephora was wearing it and it looked really nice. I was concerned about the glitters being that close to the eye and she said that she hadn't experienced any migrating of the glitter into the eye so I decided to pick it up in gold and in silver.
The tip of it is like a regular eyeliner brush and after that there is the mascara brush. It actually takes quite a few swipes to get the glitter onto your eyelashes but after I tried it, I decided that I like using it as just an eyeliner. Unfortunately, there was a LE mini set of this in just eyeliners and that probably would have been a better purchase for me since I ended up deciding that I will not use it on my lashes.
Swatch so that you can see what it looks like:
I like the way it gives a litte bit of sparkle to your eye. I had a lot of women friends who loved it. It was only the hubs who, at the end of the night, asked if that's glitter or tears!
I initially really liked Loaded but I'm noticing more and more that there's actually a brown undertone to it. It's very similar to MAC Club, at least in pictures. I need to find a true Deep Emerald green eyeshadow as I love the color. Any suggestions?
*Kat*
Last night I had a business dinner to go to and so I felt that I needed to dress up a bit even though the restaurant that we went to doesn't have a high class environment.
Products used:
Giorgio Armani Eyes to Kill 20, 21 and 23
Addiction Eyeshadow Mystic Mirage
K-Palette Real Lasting Eyeliner
NARS Larger Than Life Long Wear Eyeliner
Shiseido Mascara Base
Canmake Agebuto Mascara
Sephora Full Action Extreme Effect Mascara
Clarins Skin Illusion Natural Radiance Foundation 109
Canmake Cheek & Cheek Blush 06 (LE)
Urban Decay Super Saturated High Gloss Lip Color Love Child
I did an explanation of the Giorgio Armani Eyes To Kill EOTD in my post here. The only difference is that I added Mystic Mirage to the outer brow bone area and used NARS eyeliner on water line of upper eyelid. I curled my lashes and used Shiseido mascara base which helps to hold my curl. I applied Agebuto mascara, which is a waterproof mascara and that also helps hold my curl. I then applied the Sephora mascara because I like the effect that it gives as it really seems to darken the lashes and make it fuller. I'm sorry but I forgot to separate my lashes before taking the picture!


The foundation that I used tonight was Clarins Skin Illusion Natural Radiance Foundation in 109. This foundation gives a nice finish and while it's rather natural looking, it also gives good, long-lasting coverage. Since my eyes were made up darker than normal, I decided to go with light cheeks and lips. I'm really loving the Canmake Cheek & Cheek blush in 06. Too bad it's an LE shade. Lips were done using Urban Decay pencil gloss in Love Child.
I love how this Canmake Blush gives a nice pink flush to the cheeks. It's nicely pigmented so you can apply too much--yes, I've done it! Please take note of my beautiful handmade earrings from Fushigi Shop. I wore these thinking that it's the perfect time to wear it. Please do check out this wonderful store with enticing jewelry pieces. Yasumi is away on vacation right now but she will soon be returning and coming up with more beautiful and unique creations.
I must say that when I purchased the Eyes to Kill eyeshadows, I was hesitant on #23 (the opalescence white shadow). I'm so glad that I bought it because it has to be my favorite of the 3 colors that I purchased.
*Kat*
Today's review is on the Daiso Double-Ended Stick Concealer.
This was in Yumeko's "Top 8 Beauty Related Buys from Daiso here. She graciously gifted me with one and I finally got around to trying it out.
One of the unique things about this concealer is that it is double ended. One end is wide and the other end is pencil tip thin.
I like this concept especially if you are wanting to conceal smaller problem spots.
Before I continue into my concealing method, please let me ramble on a bit about my skin blemish "history". I grew up with freckles, a bit unusual for a full-blooded asian, I think. I always hated my freckles especially as they continued to multiply as I grew older. Of course, living in Hawaii and always being in the sun didn't help especially since back when I was in my teens, sun screen protection wasn't stressed. Then one day, I had a pimple on my cheek and after it was gone, it left a dark spot which also blended into a cluster of freckles leaving one huge dark spot on the apple of my cheek which, to this day, doesn't lighten or go away. I've tried many lightening products and have had many suggestions from makeup artists as to the best technique and products to use to conceal this dreaded large spot as well as my smaller freckles. One suggestion was to use an orange-colored pencil to conceal as many makeup artists use this technique especially for photo shoots. I tried it and unfortunately ended up with orange spots that really weren't obvious unless you looked at closeup shots or saw me in person really close up.
So I've taken all the information that I have gleaned over the years and came up with what works best for me. It's probably most unorthodox and perhaps many professional makeup artists will cringe but it's what works for me and I'm happy with the result.
I must say that I like using a peach-toned concealer and my HG is Sue Devitt Bermuda Triangle Undereye Corrector. For the purposes of this post, I'm using the Daiso Double-Ended Stick Concealer to review it at the same time. My technique and products that I use is the same, just the concealer is different.
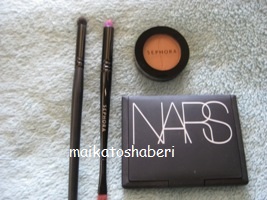
Normally I prime and prep my face and do most of my eye makeup first and then I conceal and apply foundation. Besides the concealer, the other products that I use are Sephora Smudge/Eyeliner brush, e.l.f. contour brush, Crown Brush fluff brush, Sephora Eyeshadow in sun-kissed N° 78 and NARS Orgasm blush.
I start off with my primed and prepped face.
Using the wider end of the Daiso concealer, I smudge some of it onto my finger and pat it under my eyes.
Using whatever is remaining on my finger, I pat it onto the large dark spot and to the sides of my nose. Using the Sephora brush, I pick up some concealer and start covering the large dark spot.
Using the pencil tip end of the concealer, I dot the larger, darker spots. (Normally I use the Sephora brush to apply concealer to the larger, darker freckles.)
The concealer is quite visible and this is true even with my HG concealer.
To help create a more natural concealed look, and to provide more coverage for the large, dark spot, I use the e.l.f. brush and pick up some Orgasm and then some sun-kissed and apply it to the large dark spot. Trying to keep a light hand, I add this combination until it is concealed decently well.
Using only sun-kissed, I apply it to the other spots that I used concealer on. Using the Crown Brush fluff brush, I lightly apply sun-kissed to under eye, sides of the nose and and over all the dotted areas to blend everything together.
My face is now ready for foundation to be applied.
I do realize that the normal procedure for applying concealer is liquid foundation first and then conceal, or if you are using powder foundation, then you conceal first. Although I use liquid foundation, I like to conceal first because the areas where you use a concealer will be lighter. Applying a foundation over will minimize and most likely eliminate the white lighter spots. This is also the reason why I like to use a flat-topped brush and stipple on my foundation. Oftentimes I will apply more Orgasm to the large dark spot before and after applying foundation. Because it is on the apple of my cheek I need that area to have more "orange" coverage. After applying blush, it is concealed nicely. If I use a lighter color or powder to cover and set the concealer, that area will show up as a white spot under the blush. I have found Orgasm to be the best color for this purpose. I originally wanted to use a matte eyeshadow as sun-kissed is a bit pearlized but this color was the best for what I wanted to do and it ended up working out much better, I think. It helps to brighten up the under eye area and I think that it also helps to reflect light away from any imperfections.
Although the Daiso concealer isn't peach-toned, which I normally like, using this method helped to color correct the concealer so that it worked out nicely. In Japan, this concealer is only 105 yen, which is a bargain! It worked well on me. I didn't need to touch up (although I don't touch up unless I'm going to go out after work) and it didn't settle into fine lines. As Yumeko said in her post, it's great for keeping in your office drawer or gym locker.
Sorry for the length of this post. I know that it seems like a lot of steps and time consuming but it actually goes quite quickly for me. I must say that I have a love-hate relationship with my dark spots. I really dislike having the dark spots on my face and am considering medically getting it removed. However, I do like the fact that I can test and see how well a product works by having the dark spot.
I will write a post on how I apply my foundation another time.
*Kat*
With Valentine's Day coming up next week Tuesday, I decided to work on a simple Valentine's look.
Products Used:
Urban Decay Eyeshadow Primer Potion in Eden
Urban Decay Pistol Eyeshadow (from NAKED 2)
MAC Eyeshadows: Yogurt and Swish
NARS Eyeshadow: Red color from Hanamichi Palette
K-Palette Real Lasting Eyeliner
L'Oreal Voluminous False Lashes Mascara
Tarte Starlet Amazonian Clay Blush (From Starlet Palette)
Revlon Berry Smoothie Lip Butter
Primed my eyelids with Eden. Yogurt is applied just under the eyebrows. Swish is applied to the inner 1/3 of eyelid from lash line to crease line. NARS red eyeshadow is applied to middle 1/3 of eyelid, from lash line to just above crease line and blending upward and outward. Pistol is applied (the one marked with the white "x") to the outer 1/3 of the eyelid from lash line to just above creaseline and slightly blending it upward and outward. I also blend it in the crease line having it fade as I work my way toward the inner eye. Lined the upper lash line and outer corner of the lower lash line with K-Palette. Using Pistol, I apply it over K-Palette on the lower lash line and blending and fading it towards the middle of the lower lash line. Mascara is applied to uncurled eyelashes.
Starlet is applied to my cheeks and Berry Smoothie to my lips.
This eye makeup look is definitely much more pastel than I usually wear. As a result, I really felt that I needed to wear mascara although I don't normally do so, especially for going to work every day.
I consider it to be a sweet and innocent look, neither of which I am. Haha!
Hope you'll be enjoying Valentine's Day with your special someone.
*Kat*
In the previous post, I did a FOTD using the NARS Hanamichi palette. I wasn't quite pleased with how the eye makeup came out and I did mention a couple of ideas that I had on how to change it up a bit. I decided to try it out again today using my own suggestions and I am much more pleased with the way the look came out.
Products used:
Urban Decay Eyeshadow Primer Potion in Eden
NARS Hanamichi Palette
MAC Orb
Urban Decay Half Baked
K-Palette Real Lasting Eyeliner
Canmake Agebuto Mascara
I started the EOTD off the same way using the 3 colors from Hanamichi and MAC Orb. I then went over the gold color with Half Baked, which helped to lighten and brighten the inner eyelid area. I also used the gold color to soften the harsh lines of the black color and also added and blended it in the crease contour area and above on just the outer half of my eye. I lined my upper lash line and outer corner of the lower lash line with K-Palette. Using the black shadow I lightly went over the eyeliner on the lower lash line and then using the gold I applied it to the middle of eye of the lower lash line. I then went over the gold with the off-white highlighter color. I applied Agebuto mascara to my eyelashes that I curled.
The rest of my face was done the same way, with me using the red color as my blush. I also used the off-white color to highlight the upper cheekbones. NARS Mitzi was used on my lips again.
I think that by using Half Baked, which is a brighter gold color, it did help to make the inner eye area look--well, brighter. There was some pop to it, whereas using the gold from Hanamichi didn't seem to do much for me. I also let the red color show up more prominently, as well as the black. Overall it was a darker eye look from the previous post but I felt that it gave my eyes a little more definition, which I liked much better.
*Kat*
There are a couple of products that I'll be showcasing in today's review. I was able to get my hands on the LE Hanamichi palette a couple of weeks ago at a great deal thanks to Lulu of Luluchinadoll. She posted on twitter that we could get a really great deal of $80.00 worth of product from NARS for only $40.00. It was a great opportunity to purchase the Hanamichi palette that I had debated about getting but not wanting to pay the $65.00 price tag. I ended up getting a lipstick to fully use the $80.00 credit.


Have you ever done your makeup and then wished you remembered what you used so that you can recreate it? Unfortunately, this is probably one of those where I don't know if I'd be able to recreate.
Yesterday was the husband's birthday and I spent the day running around trying to figure out what I was going to get him for his present. My first choice is not available any more due to the disaster in Japan. Hopefully after everything is rebuilt, it'll become available once again. My makeup for the day was a bit on the brighter side with muted cheeks and lips.
We had a birthday party to attend in the evening (we attended a birthday party on husband's birthday and it wasn't his party--haha) and I was planning on doing a gold and black EOTD. Unfortunately, I ended up not having time to completely wash my face and redo my makeup so I had to improvise with what was already on. As a result, I do not know how many and what colors are on my eyes.
Products used:
Face: Dermablend Cover Cream
Lioele Dollish Veil Vita BB Cream in Natural Green
Hada Labo BB Moist Cream in Natural Ochre
Guerlain Meteorite Perles in Teint Rose
Eyes: Mezaik Double Eyelid Stretch Fiber
Urban Decay Eyeshadow Primer Potion in Eden
Sephora, Urban Decay and MAC eyeshadows
K-Palette Real Lasting Eyeliner
Fairydrops and Gokubuto Mascara
Cheeks: Canmake Loose Cheek in 01
NARS Laguna Bronzer
YSL Touche Blush in 5
Maquillage Face Creator
Lips: The Face Shop Color Shimmer Lipstick in RD302
Noevir Natural Code Lipstick in PK22F
For my face, I only had to touch up a bit using Hada Labo BB Moist Cream and powdering over those areas with Guerlain Meteorite Perles as my face makeup stayed pretty much intact. I haven't mentioned using Lioele Dollish Veil Vita BB Cream before as I had recently received a sample of this from a wonderful person who reads this blog. I will be doing a review on it soon.
During the day, I know that I used Sephora and Urban Decay eyeshadow palettes but I was just playing around with colors so I don't know what I used. I had actually done a similar look using similar colors once before but a much more muted look. I wanted to try the brighter look because I was inspired by Jenn of From Head to Toe and her recently uploaded tutorial. If you haven't read her blog, please check it out. She has an awesome blog and great YouTube videos.
For the evening party look, I decided to smoke it out more and added darker colors on the outer "V" using MAC's Contrast and blended it in. I didn't need to do much at all thanks to UDPP. Even with the hot weather and running around all day, nothing creased or faded.
I also added mascara to my lashes as I didn't use it during the day. What I didn't do and should have was to curl my lashes. NOTE: Colors are darker and more intense on real life.
During the day I had Canmake Loose Cheek in 01 on my cheeks. For the evening, I wanted to glam it up a bit so I bronzed with NARS Laguna and dabbed on YSL Touche Blush in 5 on apples of cheeks and blended it outward toward hairline.
I softened it up a bit by highlighting using highlighter colors from Maquillage Face Creator.
On lips I used The Face Shop Color Shimmer Lipstick in RD303, which is a beautiful deep red color. It's a bit too intense for my liking so I topped it with Noevir Natural Code Lipstick in PK22F, which I find a bit too light when used alone. Together, they work to form a beautiful color that I like.
Together they work to form a beautiful color.
The party was at a beautiful hotel in one of their lovely ballrooms. I'm glad that I decided to go with a more glamorous look for the party.
*Kat*